Friday, April 27, 2012

plush alphabet magnets - part 2: sewing

Okay, part 2 of this tutorial will actually cover more than just the sewing... but that was the best title I could come up with for it.

Once you've cut out all of your pattern pieces, you'll need to pick fabric for each of the letters and shapes. I tried to find fabric that kind of matched the shape for each letter - like the C and cloud are made from a sky blue fabric with white flecks.


This was actually my favorite part, going through all my old scraps and trying to find just the right fabric for each letter.  Oh, and I did each letter and corresponding shape in the same fabric to help with the "matching game" aspect of it.

Cut out two squares for each letter and shape (front and back).  Each will be approximately 2.5" square, though a few of the shapes are a little bigger so make sure you check.

My stack of scraps with their corresponding letters and shapes, almost ready to sew!

Then cut out squares from quilting batting in the same size.

My 52 batting squares, ready to be pinned to the fabric

Now you're ready to start assembling all of your letters and shapes!

Step 1: pin a piece of batting between two fabric squares.  Make sure the fabric is facing right side out on the front and back.

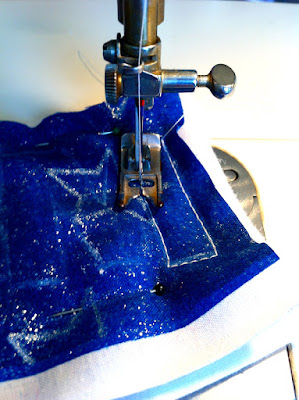
Step 2: Place your pattern piece on the fabric and trace around it with a fabric marker (the kind that disappears on its own)

Ready to sew!

Step 3: Stitch along the outline you just traced.  This takes a fair amount of patience (and occasional seam-ripping if you're like me and get impatient...) because you have to go pretty slow to get around all the detailed curves and turns.

Ta-da!

Step 4: Carefully cut around the seams to cut out your shape.  Leave just a little bit of space beyond the stitching - don't cut too close or you might actually cut through the thread.

Step 5 (through like 500): Repeat for each letter and shape!  

This is definitely a time consuming project, but I've enjoyed it, and I think (hope!) it's going to turn out really well.

Some of the letters and shapes I've finished already

Just a quick note - you might notice that the balloon, jellyfish, and kite all have ribbon sticking out of them.  I pinned the ribbon between the layers before sewing, and then just carefully cut the layers separately where the ribbon was.

I still have to finish about 7 more letters, attach the magnets, and make the quiet book pages, but it's slowly getting there!


Friday, April 20, 2012

plush alphabet magnets - part 1: the pattern

Inspired by some various projects I've seen for using up scraps, I decided to make an alphabet matching game using some of my ridiculous amounts of scrap fabric.  And of course, the project kept growing as it went, and is taking a while to perfect, but I think the outcome is going to be great!


I may even use this same idea/pattern to attempt an alphabet quilt.  No, I don't actually know how to quilt.  Yes, I'm crazy.

I decided to break this project up into multiple posts because I think otherwise I'd end up with one monstrous, confusing tutorial.  So today I'm posting about the beginning of the process, and the free printable pattern!

For the letters I used Arial Black - I wanted a font that would be easy to trace and cut out, and the letters would be very clear.  If you make your own pattern, be sure to choose a sans serif font - one without the little lines at the edges of the letters - because they are much easier to cut out, and also easier for kids to identify.

ex:  A     A

The one on the left is a sans serif, the one the right is not - it has serifs.

Here is the printable pattern for all of the letters.

Then came the tricky part - coming up with something for each letter that could be easily identified when just the shape was cut out of fabric.  And that a young child would know - or at least mine would.  It took a little while, a little cheating (X and Q are really hard!), and the help of my sisters, but I finally came up with shapes for all the letters!

(still trying to come up with a few letters here)

Some of them I modified from clip art and other pictures I found online, and many of them I drew myself (I'm really proud and surprised by this!  Maybe I can draw after all!  But only basic shapes...)  But I finally got all of them the right size, and (hopefully) identifiable shapes.

So here is the printable pattern for all of the matching alphabet shapes!


Once you've printed out your pattern, start cutting them all out.  It takes a while to cut out all the little pieces, so you can start on that while you wait for the rest of the tutorial!  :)

A few of the shapes might be harder to identify, so let me explain.  J is a jellyfish, but it's going to have ric-rac/ribbon tentacles, so I didn't draw them on the shape outline.  Q is for queen, but this one I kind of cheated and did a crown.  The rectangle for X is for "x marks the spot" and it's a treasure map - I have some awesome pirate-themed fabric that is perfect for this one!  Is this one cheating too?  I think it might be... And the circle for Y is for yo-yo.  I'm going to attach a string/ribbon to it.

Once it's all finished, I'll have the matching game magnet book pages with all of the letters and shapes.

One of the fun things about these patterns is that they can be used for so many other things - as stencils, coloring pages, other matching games, really anything.  If you come up with a fun way to use them, please share!

More on actually making the plush magnetic versions from fabric scraps coming very soon!

Monday, April 16, 2012

welcome home!

My younger sister has been gone for the last 18 months on a mission for our church, but she got home on Wednesday!  We're so excited to spend some time with her - especially since she hasn't seen Jack since he was a little baby!

So to welcome her home, Jack and I made an awesome shirt for him to wear to the airport.


You can probably tell which parts he did, and which I did.  I think maybe the two of us could start a modern art gallery.  


This was probably the best picture we got of him actually wearing his welcome home shirt, even though you can't see the shirt very well... But the other pictures he looks rather grumpy or blurry because he wanted to run up and down the escalators.  And of course I tried to get a picture of him with my sister, but that was probably the worst one of the day!  We'll have to try again another day.

Jack had fun spending time with all of his Aunties this weekend!

(Do we look like sisters?)

Friday, April 6, 2012

Easter cupcakes

I feel like I have to start off with a bit of a disclaimer - I am not a cupcake person.  I know they're really popular right now, but I've just never really been a huge fan.  Maybe because (shocking, I know) I don't really like cake that much either.  It has to be just the right cake, or I'd rather eat brownies.

That being said, I needed to make some Easter treats to take to some neighbors, and this was going to be the best, easiest, and cutest option.  So I went ahead and made some cupcakes.  Plus, my husband loves cake, so he was happy.

Chocolate cupcakes with green frosting, green coconut, and M&M eggs

Or flower sprinkles

To dye the coconut, just put some in a plastic bag (I used about 1/2 cup for 2 dozen cupcakes) and add 3-4 drops of green food coloring, and squish it around until all the coconut is green.

Be sure to put the coconut on top of the frosting before the frosting starts to set or harden.  I would frost about a half dozen at a time, then add the coconut.

Oh, and just put a little dab of frosting on the M&M's or Robin's Eggs to get them to stay in place on top of the coconut.
Ta-da!  Easy, cute, and very Eastery!

And because they make me happy, a picture of the pink hyacinths coming up in our yard.  I love spring!!


Update: I recently decided to start a separate blog for recipes and other food/cooking related things. You can see these cupcakes and a whole lot more over on Modern Mommy's Kitchen!


Tuesday, April 3, 2012

Peter Pan finger puppets

A bit later than I'd hoped, but they're finally done!  I had some orders come in and some other projects come up, so I didn't get these done as soon as planned, but here are the aforementioned Peter Pan finger puppets!

This is the full ten piece set with (from top left to bottom right) Wendy, Peter Pan, Tinkerbell, Captain Hook, Smee, Crocodile, Tigerlily, Lost Boy, Michael, and John.

I'm also selling them as a five piece set with the Crocodile, Captain Hook, Peter Pan, Tinkerbell, and Wendy.


I had a lot of fun designing and making this set.  They're definitely the most detailed and intricate of any of the puppet sets I've done so far.


Even the backs are really detailed.  I love the little tails on the crocodile and lost boy, and of course the little bum flap on Michael's pajamas.

A close-up of Captain Hook.  It's a bit hard to see (shouldn't have used a white background... oops!) but he has a big white feather sticking out of his hat.

Close-up of Mr. Crocodile, complete with mouth that opens to reveal pointy teeth!

Tigerlily was one of my favorites to design and make.  I hand-stitched the accents onto her dress and even braided the black felt for her hair.  Plus I love the bright turquoise feather.

I've got several more new puppet sets in the works, and hopefully will have them done and pictures up soon!

Also, I'm going to be raising the prices on some of my older finger puppet sets, so if you want to get them at their current low prices, place an order in my shop before the end of the week!  Price changes will be effective this Saturday.